Saturday, 19 March 2011

Shot_06 AO Testing

Lighting design is definitely important for a piece of animation, not only improving the storytelling but also making the scene more realistic and believable. However I do not have enough time to render Global illumination and Final Gethering as I want to put more focus on my research and practice working rather than rendering. So I need to find another way to improve its effect in term of Ambient Occlusion, like the picture below. 

According to Wikipedia, http://en.wikipedia.org/wiki/Ambient_occlusion, Ambient occlusion is a shading method used in 3D computer graphics which helps add realism to local reflection models by taking into account attenuation of light due to occlusion. Ambient occlusion attempts to approximate the way light radiates in real life, especially off what are normally considered non-reflective surfaces.

Unlike local methods like Phong shading, ambient occlusion is a global method, meaning the illumination at each point is a function of other geometry in the scene. However, it is a very crude approximation to full global illumination. The soft appearance achieved by ambient occlusion alone is similar to the way an object appears on an overcast day.

Ambient Occlusion
diffuse only
combined ambient and diffuse
Obviously there are more details and more beautiful depth after combination.

Ambient occlusion is most often calculated by casting rays in every direction from the surface. Rays which reach the background or “sky” increase the brightness of the surface, whereas a ray which hits any other object contributes no illumination. As a result, points surrounded by a large amount of geometry are rendered dark, whereas points with little geometry on the visible hemisphere appear light.

Ambient occlusion is related to accessibility shading, which determines appearance based on how easy it is for a surface to be touched by various elements (e.g., dirt, light, etc.). It has been popularized in production animation due to its relative simplicity and efficiency. In the industry, ambient occlusion is often referred to as "sky light."

The ambient occlusion shading model has the nice property of offering a better perception of the 3d shape of the displayed objects. This was shown in a paper where the authors report the results of perceptual experiments showing that depth discrimination under diffuse uniform sky lighting is superior to that predicted by a direct lighting model.

The occlusion A_\bar p at a point \bar p on a surface with normal \hat n can be computed by integrating the visibility function over the hemisphere Ω with respect to projected solid angle:

                                    
A_\bar p = \frac{1}{\pi} \int_{\Omega} V_{\bar p,\hat\omega} (\hat n \cdot \hat\omega ) \, \operatorname{d}\omega
where V_{\bar p,\omega} is the visibility function at \bar p, defined to be zero if \bar p is occluded in the direction \hat\omega and one otherwise, and \operatorname{d}\omega is the infinitesimal solid angle step of the integration variable \hat\omega. A variety of techniques are used to approximate this integral in practice: perhaps the most straightforward way is to use the Monte Carlo method by casting rays from the point \bar p and testing for intersection with other scene geometry (i.e., ray casting). Another approach (more suited to hardware acceleration) is to render the view from \bar p by rasterizing black geometry against a white background and taking the (cosine-weighted) average of rasterized fragments. This approach is an example of a "gathering" or "inside-out" approach, whereas other algorithms (such as depth-map ambient occlusion) employ "scattering" or "outside-in" techniques.
In addition to the ambient occlusion value, a "bent normal" vector \hat{n}_b is often generated, which points in the average direction of unoccluded samples. The bent normal can be used to look up incident radiance from an environment map to approximate image-based lighting. However, there are some situations in which the direction of the bent normal is a misrepresentation of the dominant direction of illumination, e.g.,


In this example the bent normal Nb has an unfortunate direction, since it is pointing at an occluded surface.
 

In this example, light may reach the point p only from the left or right sides, but the bent normal points to the average of those two sources, which is, unfortunately, directly toward the obstruction.


Reference:


Tuesday, 15 March 2011

Lighting Test of Shot_01

one point light
AO Pass
Combination
Definitly there are more details on the object after combining.

According to my previous research the lighting effect in the space is hard so I just use one light for illuminating. There are three types of lights in XSI, point light, spot light and infinit light. After testing, I choose point light finally, like the picture above, as shot_01 is a long shot which will last 20 seconds, I need to make sure each image is relatively nice. Also it could be naturelly fall off which is essential to avoid audience having misunderstandings. 

I will render its z depth pass and AO tomorrow and when I finish its materials and textures I will render other passes.

Sunday, 13 March 2011

Shot_06_Unfinished

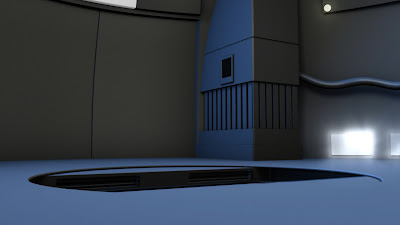
Before the Shot_06 the UFO has been recycled into the spaceship. Now it is taken to the cockpit by elevator...

The camera is close-up as I want to show its details and at such an angle the audience could appreciate the back of the spaceship. So the audience has a whole understanding about its internal environment at this moment.
02. The lid is separating into two parts.
03. The elevator is going up slowly.
04. The elevator is lasting going up. All of four images are objective shots which are used for showing the internal environment and I can easily change them to point-off-view in the following shots.


Thursday, 10 March 2011

Shot_03

The red alarm is warning and shining suddenly when he is appreciating the universe. He is surprised and turning around quickly.

03_01. He is rotating the mouse and clicking on the buttons to appreciate the universe. Suddenly the red alarm is warning and shining strongly.
03_02. He turns left to look at it and at the same time, the camera is moving to the right a little bit, to make a certain distance and angle between him and the alarm.  It will easily attrack the audience to put more focus on them and clearly understand their reactions.
03_03. During he turning around, the shot is changed to 03_03. The camera is on the opposite position, which enhance the action of the red alarm and make the image more balance. Moreover it is good for connecting the next shot.

Monday, 7 March 2011

Continuity

Recently I have made some tests of camera angle. I find that at the same time, I need to research on how to connect them together for story telling.

According to Mascelli (1965), a professional sound motion picture should present a continuous, smooth, logical flow of visual images, supplemented by sound, depicting the filmed event in a coherent manner. It is continuity that decides success or failure of the production.

A cameraman shooting off-the-cuff must think in sequences, and not in individual shots. Action will flow smoothly from shot ot shot only when the over-all action of the entire sequence is broken down into particular actions required in each shot. Good continuity encourages the viewer to become absorbed in the story-telling, without bothersome distractions. The prime purpose of a motion picture, whether theatrical fiction feature or documentary fact film, is to capture and hold audience attention.

To accomplish this, the film must be presented in visual images, inviting viewers to become iinvolved in the screen story. If viewers have to figure out where the camera has suddenly shifted, or why an unexplained change has occurred in player's action, the spell is broken.

"Smooth, fluid, realistic continuity can contribute more to a motion picture's success than any other cinematic device."

                                                                          by Joseph V. Mascelli.

Reference:

Mascelli, J. V. (1965). The Five C's of  Cinematography. The United States: radstone publications.

Saturday, 5 March 2011

Shot_02


01
At the beginning, picture 01 is in the shot and it moves to right slowly with a little shining.

02
After 3 seconds, the picture 01 is gradually subsided instead by picture 02.

03
The shot is zoom out and transforming to picture 03.
04
The camera is moving a little and it becomes to picture 04.
05
At this moment, he rotates mouse to set the telescope and the other hand clicks on the buttons of the keyboard.
At such an angle, the audience will easily focus on his action of the hands. Moreover it is very important to begin the shot_03, this image is also the beginning of the shot_03. There is a red alarm next to the shining screen. In shot_03, the red alarm is shining suddenly, which will light up his outline of right side...

The shots reveal that the spaceship has departed from the Milky Way Galaxy and artfully implies the character of the story, who is behind the telescope. 

In the next step I will make more details based on the frame.

Tuesday, 1 March 2011

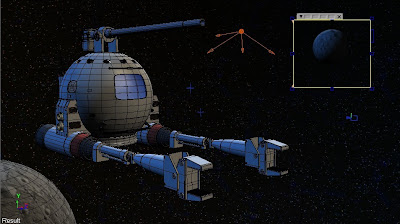
Shot_01_New

Today in the tutorial, Andy gave me some advices about the shot_01 of my project. The camera shots are uncomfortable for audience to some extent. Because I made the camera animation instead of the movement of the spaceship, which made mistakes in the relationship among spaceship, camera (viewer) and the background (space). After the class I make another experiment of shot_01. Based on the same purpose, I make the spaceship flying in the space at the same speed. The camera_interest moves with its mainbody, but stopping the movement earlier than the spaceship. In order to make the camera from high angle to eye-level angle to low angle, I animate the camera vertically a little and keep its camera_interest moving at the same line. At the same time, I move the background in opposite direction with the spaceship to enhance the effect of flying. 


In next fews days I will make some lighting tests of the shot_01.